| vue3实现用户角色及权限分配功能(一) | 您所在的位置:网站首页 › vue 权限控制树 › vue3实现用户角色及权限分配功能(一) |
vue3实现用户角色及权限分配功能(一)
|
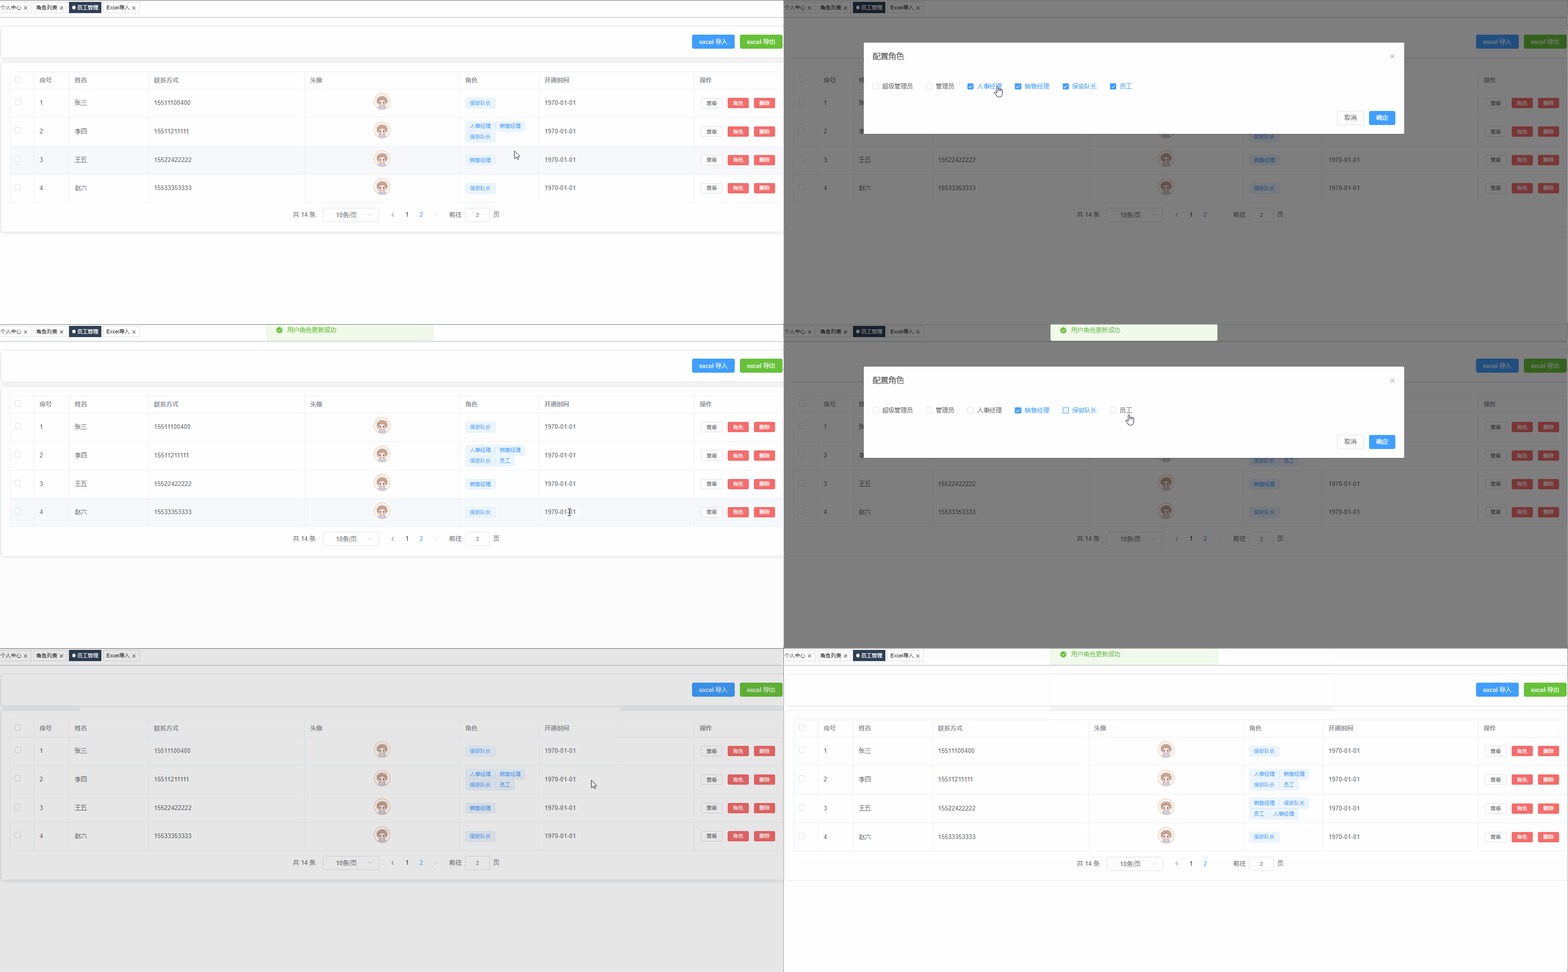
此为demo练习项目功能记录(个人思路二次整理),如有不恰当之处欢迎指正~ 文章目录一、实现用户角色及权限分配功能的整体思路 二、实现步骤 (一). 员工管理列表--员工角色分配功能实现 1. UserManage及RoleDialog组件生成 : (动态渲染列表页面,设置RoleDialog的显示隐藏状态) 2. 分配角色:(渲染当前用户已有角色,重新分配角色) (二). 角色列表 -- 角色权限分配 : 1. RoleList.vue及PermissionDialog 组件生成 : (动态渲染列表页面,设置PermissionDialog 的显示隐藏状态) 2. 分配权限 三、总结 一、实现用户角色及权限分配功能的整体思路 设置管理员角色(具有角色权限分配的账户 super-admin,初始化配置)设置对应的角色列表,为用户指定角色;设置权限列表. 查看,设置 角色能够查看的权限; 二、实现步骤 (一). 员工管理列表--员工角色分配功能实现 1. UserManage及RoleDialog组件生成 : (动态渲染列表页面,设置RoleDialog的显示隐藏状态) 新建 user-manage/UserManage.vue 文件 :根据后端返回的数据,动态渲染用户列表; 点击角色,展示dialog: 新建 user-manage/modules/RoleDialog.vue 调后端接口获取所有的角色信息 , 动态渲染 组件 // js : const allRoleList = ref([]) // 获取所有的角色信息 const getRoleList = async () => { allRoleList.value = await getRoleListAction() } getRoleList() user-manage/UserManage.vue : 引入 RoleDialog.vue 组件 并使用新建 const roleDialogVisible = ref (false) --控制dialog的显示隐藏状态为 角色 按钮 绑定 showRoleDialog 方法 , 传入 scope.row(当前行数据--后面获取userId使用) ; 点击时 roleDialogVisibl.value = true ; const roleVisible = ref(false) const showRoleDialog = (row) => { roleVisible.value = true } 使用v-model="roleDialogVisible " 将变量传给 RoleDialog.vue 组件; 先插入一段 容易出现的问题,再看下面的完整代码会避免一些小问题:在 3.x 中,自定义组件上的 v-model 相当于传递了 modelValue prop 并接收抛出的 update:modelValue 事件: // ChildComponent.vue export default { props: { modelValue: String // 以前是`value:String` }, emits: ['update:modelValue'], methods: { changePageTitle(title) { this.$emit('update:modelValue', title) // 以前是 `this.$emit('input', title)` } } }关于 v-model 的 迁移 -官网地址 :v-model | Vue.js 在user-manage/modules/RoleDialog.vue 修改props的值时 会报以下错误: error Unexpected mutation of "modelValue" prop 因为vue默认不允许在子组件修改父组件prop传入的值,使用v-model进行数据绑定时也是对prop进行修改.所以将v-model替换为 :model-value ; 新建 user-manage/modules/RoleDialog.vue : 使用 defineProps 接收 UserManage.vue 传入的值,v-model绑定传入的值直接使用modelValue进行接收 ; const props = defineProps({ modelValue: { type: Boolean, required: true } }) 设置的:model-value="modelValue" :绑定的关闭,确认事件 : 需要通过 defineEmits 去改变 父组件通过 props 传入的值 ;const emits = defineEmits(['update:modelValue'])声明 handleClose 方法 , 调用emits,修改modelValue的值;const emits = defineEmits(['update:modelValue', 'updateRole']) const handleColse = () => { emits('update:modelValue', false) } 2. 分配角色:(渲染当前用户已有角色,重新分配角色) user-manage/UserManage.vue : 通过1.3.3步骤写的方法 showRoleDialog 获取当前点击的 userId , 传入 RoleDialog.vue const userId = ref('') const showRoleDialog = (row) => { roleVisible.value = true userId.value = row._id } user-manage/modules/RoleDialog.vue : 通过 props 获取 传参 , 并声明 getCurrentRole 方法获取 当前用户已存在的角色 const props = defineProps({ modelValue: { type: Boolean, required: true }, userId: { type: String } }) const checkList = ref([]) // el-checkbox 双向绑定的参数 const getCurrentRole = async () => { const { role } = await getCurrentRoleAction(props.userId) checkList.value = role.map((item) => item.title) } 点击 确定 按钮 触发 handleConfirm 事件 : 获取 选中的 角色 数据, 调后端接口,成功后显示成功信息 ; 这时更改角色完成,页面不会立即更新,需要手动刷新,角色信息展示才会更新;所以需要 使用 emits 绑定 updateRole 事件 触发页面更新 const emits = defineEmits(['update:modelValue', 'updateRole']) const handleConfirm = async () => { handleColse() const roles = checkList.value.map((title) => { return allRoleList.value.find((item) => item.title === title) }) // 处理成后端需要的数据格式 await updateRoleAction(props.userId, roles) //调用接口 ElMessage.success(i18n.t('msg.role.updateRoleSuccess')) //成功提示 emits('updateRole') // 触发父组件的更新事件 } user-manage/UserManage.vue : 接收 子组件传递的 事件 :以上 : 用户角色功能已实现完成 ; 附完整代码及完整效果展示 : 效果展示 :
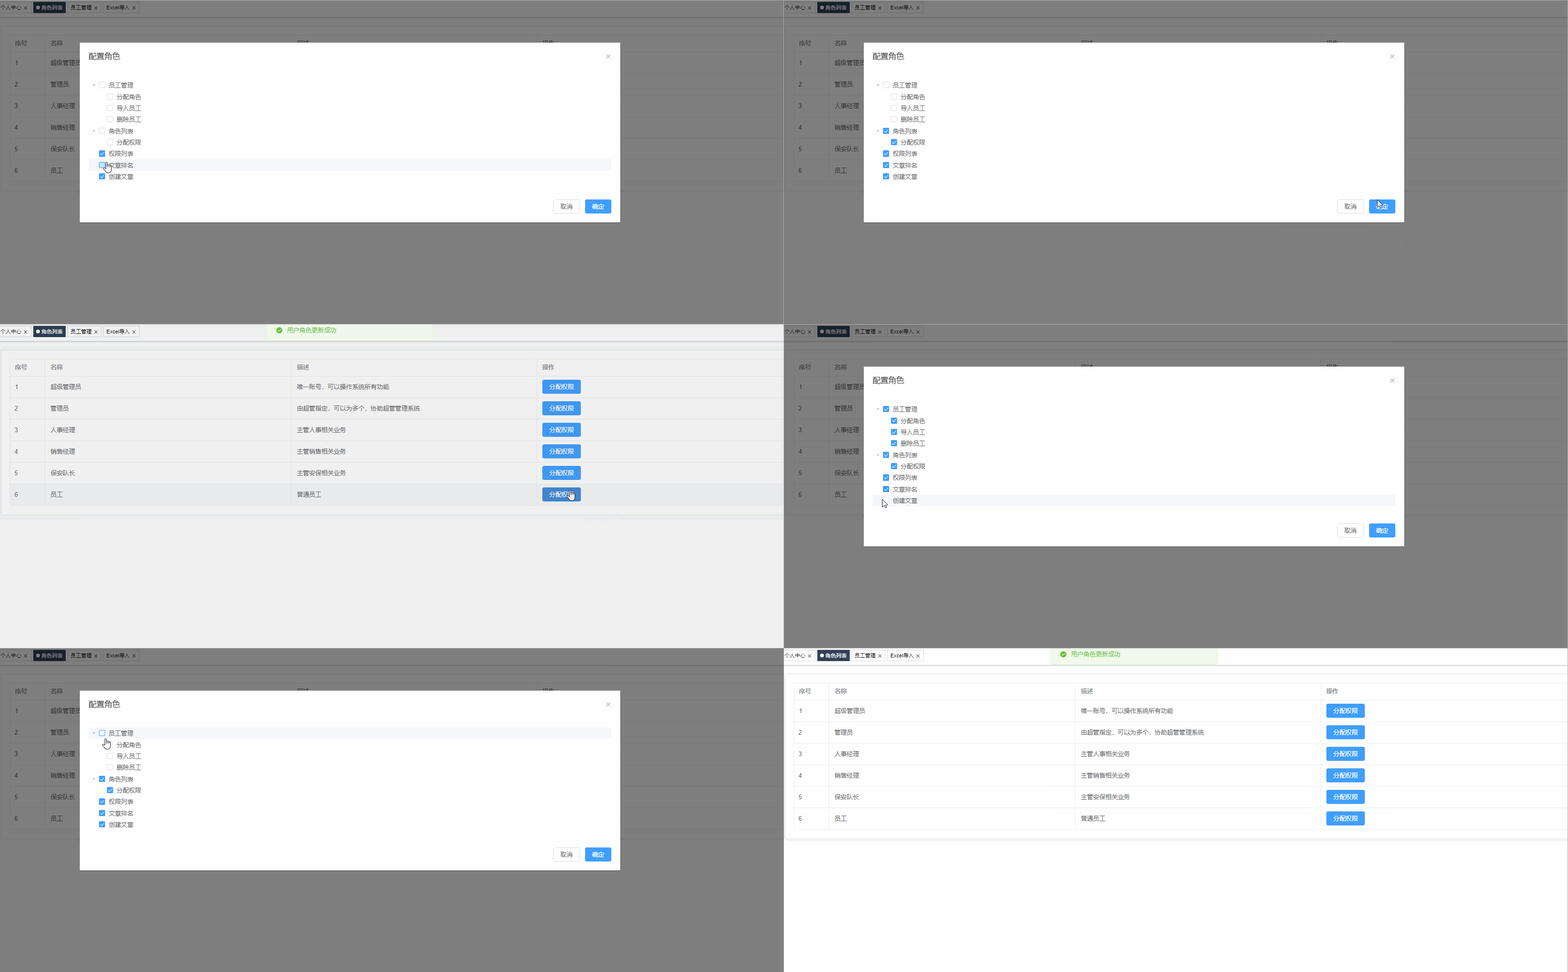
user-manage/UserManage.vue : {{ item.title }} {{ $t('msg.excel.defaultRole') }} {{ $filters.filterDate(scope.row.openTime) }} {{ $t('msg.excel.show') }} {{ $t('msg.excel.showRole') }} {{ $t('msg.excel.remove') }} import { ref, onActivated} from 'vue' import { userManageListAction, deleteUserAction } from '@/apis/user' import { InfoFilled } from '@element-plus/icons-vue' import RoleDialog from './modules/RoleDialog' // 表格数据 const tableData = ref([]) // 分页器数据 const currentPage = ref(1) const pageSize = ref(10) const pageTotal = ref(0) // 调用接口 -> 获取table数据 const getTabelData = async () => { const res = await userManageListAction({ page: currentPage.value, size: pageSize.value }) const { list, total } = res pageTotal.value = total tableData.value = list } getTabelData() // 激活生命周期 onActivated(getTabelData) // 分页器功能 const handleSizeChange = (val) => { pageSize.value = val getTabelData() } const handleCurrentChange = (val) => { currentPage.value = val getTabelData() } // 分配角色 const roleVisible = ref(false) const userId = ref('') const showRoleDialog = (row) => { roleVisible.value = true userId.value = row._id }user-manage/modules/RoleDialog.vue : {{ $t('msg.universal.cancel') }} {{ $t('msg.universal.confirm') }} import { defineProps, defineEmits, ref, watch } from 'vue' import { getRoleListAction, getCurrentRoleAction, updateRoleAction } from '@/apis/user' import { ElMessage } from 'element-plus' import { useI18n } from 'vue-i18n' const props = defineProps({ modelValue: { type: Boolean, required: true }, userId: { type: String, required: true } }) const emits = defineEmits(['update:modelValue', 'updateRole']) const handleColse = () => { emits('update:modelValue', false) } const i18n = useI18n() const handleConfirm = async () => { handleColse() const roles = checkList.value.map((title) => { return allRoleList.value.find((item) => item.title === title) }) await updateRoleAction(props.userId, roles) ElMessage.success(i18n.t('msg.role.updateRoleSuccess')) emits('updateRole') } const checkList = ref([]) const allRoleList = ref([]) // 获取所有的角色信息 const getRoleList = async () => { allRoleList.value = await getRoleListAction() } getRoleList() // 获取当前账户的角色信息 const getCurrentRole = async () => { const { role } = await getCurrentRoleAction(props.userId) checkList.value = role.map((item) => item.title) } // 监听 当userId变化时 再触发getCurrentRole watch( () => props.userId, (newVal) => { if (newVal) getCurrentRole() } ) (二). 角色列表 -- 角色权限分配 :此处功能 与 ( 一 ) 的实现思路及方式基本一致. 就不详细说明了 1. RoleList.vue及PermissionDialog 组件生成 : (动态渲染列表页面,设置PermissionDialog 的显示隐藏状态) 新建 RoleList.vue及PermissionDialog 组件 ; 初始化样式 .(PermissionDialog --调接口获取所有的权限列表)关于 PermissionDialog 的 显示隐藏设置和 RoleDialog 处理方式一致; 2. 分配权限 : 点击 分配权限 按钮 , 获取 roleId 传入 PermissionDialog ; PermissionDialog接收 roleId 调后端接口 获取当前角色的权限 ; 动态渲染已有的权限点 确定 按钮 调 后端接口 为当前用户 设置新的权限实现效果及代码展示 : RoleList.vue {{ $t('msg.role.assignPermissions') }} import { ref } from 'vue' import { getRoleListAction } from '@/apis/user' import PermissionDialog from './modules/PermissionDialog' const roleList = ref([]) const getRoleList = async () => { roleList.value = await getRoleListAction() } getRoleList() const permissionVisible = ref(false) const permissionId = ref('') const showPermissionDialog = (row) => { permissionVisible.value = true permissionId.value = row.id }PermissionDialog {{ $t('msg.universal.cancel') }} {{ $t('msg.universal.confirm') }} import { defineProps, defineEmits, ref, watch } from 'vue' import { getUserPermissionAction, currentPermissionAction, updatePermissionAction } from '@/apis/user' import { watchSwitchLang } from '@/utils/i18n' import { ElMessage } from 'element-plus' import { useI18n } from 'vue-i18n' const props = defineProps({ modelValue: { type: Boolean, required: true }, permissionId: { type: String, required: true } }) const defaultProps = { children: 'children', label: 'permissionName' } const allPermission = ref([]) const getAllPermission = async () => { allPermission.value = await getUserPermissionAction() } getAllPermission() watchSwitchLang(getAllPermission) // 获取当前用户的权限 const permissionTree = ref(null) const getCurrentPermission = async () => { const checkList = await currentPermissionAction(props.permissionId) permissionTree.value.setCheckedKeys(checkList) } watch( () => props.permissionId, (newVal) => { if (newVal) getCurrentPermission() } ) const emits = defineEmits(['update:modelValue']) const handleClose = () => { emits('update:modelValue', false) } const i18n = useI18n() const handleConfirm = async () => { handleClose() const updatePermission = permissionTree.value.getCheckedKeys() await updatePermissionAction(props.permissionId, updatePermission) ElMessage.success(i18n.t('msg.role.updateRoleSuccess')) } 总结截止此处,已经实现了项目中对用户角色和权限的分配,但是页面的呈现上还未设置根据权限进行展示. 后面会单独再写一篇文章进行记录.以上如有不当欢迎指正. |
【本文地址】

